Introduction
A portrait sketch is a simple drawing of a person’s face. It can be quick or detailed. This guide explains how to make one step by step. It uses clear words and short sentences. Anyone can learn this. You will find basics, tips, and helpful exercises. The content follows trusted drawing methods and teaching practices. It draws on common classroom exercises and popular portrait techniques. Read on if you want to draw a pencil portrait, charcoal face study, or a quick likeness from a photo. This article aims to make portrait sketching easy and fun for beginners and hobbyists. By the end, you will know how to plan, draw, and finish a strong portrait sketch with confidence.
What is a portrait sketch?
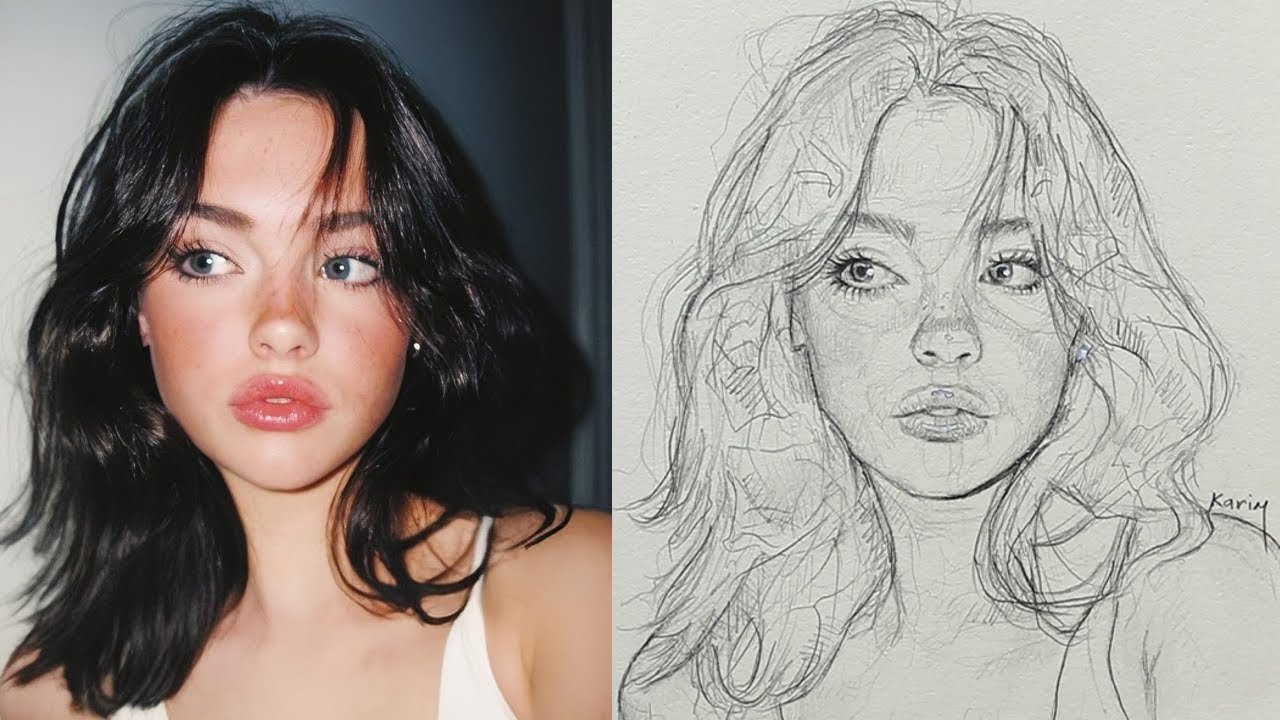
A portrait sketch is a drawing that shows a person’s face and head. It focuses on shape, form, and likeness. The goal is to capture who the person looks like. A sketch can be loose and fast. Or it can be careful and slow. Artists use pencils, charcoal, or ink for sketches. A portrait sketch often shows value and shadow. It may leave out tiny details. The sketch is a study of expression and proportion. It helps artists plan a larger painting or receive practice on faces. Many artists keep portrait sketchbooks to practice daily. A good sketch will read well from a short distance.
Materials for portrait sketching
You do not need fancy tools to start a portrait sketch. A few pencils and paper are enough. Use a range of pencils like HB, 2B, and 6B. They give light to dark tones. A kneaded eraser is handy for soft highlights. A blending stump or tissue helps smooth shading. If you like bold marks, try charcoal sticks. Skilled artists also use charcoal pencils for detail. Choose a paper with slight texture. Smooth paper works for detailed pencil work. Rough paper is good for charcoal. A sketchbook, a sharpener, and tape finish the basic kit. Start simple and improve tool choices over time.
Choosing a reference: photo or live model
Pick a good reference before you begin a portrait sketch. A clear photo works well for beginners. A photo holds still. It shows details you can study slowly. A live model gives more life and subtle motion. Life drawing trains the eye to see subtle shapes and light. If you use a photo, choose one with soft lighting. Avoid photos that are too small or low quality. For live models, position a simple light source to create clear shadows. Always respect model comfort and time. Try both approaches to learn different skills. Both photo and life practice will improve your portrait sketching skills.
Basic head proportions and construction
Start every portrait sketch with a simple head construction. Draw an oval for the skull. Mark the center line for face symmetry. Divide the head into horizontal landmarks. The eyes sit halfway down the head. The bottom of the nose is halfway between eyes and chin. The mouth sits about one third below the nose. Ears align with the brow and nose base. Use light lines to sketch these guides. Check proportions often as you draw. Adjusting early is easier than fixing dark marks later. This simple framework helps you place facial features with confidence and consistency in every portrait sketch.
Capturing the eyes, nose, mouth, and ears
Facial features give a portrait sketch its likeness. Eyes are not round like full circles. They are almond shapes with an eyelid ridge. The iris touches the top and bottom of the eye. Notice small shapes of shadow near the eye. The nose is a volume, not just lines. Think of the nose as planes that catch light. The mouth has a darker value between the lips. Pay attention to the shadow under the lower lip. Ears have many folds and small shapes. Use soft shading for inner ear details. Work slowly on features and compare both sides of the face. Small shape shifts change likeness quickly.
Shading and tonal values for depth
Shading brings a portrait sketch to life. Value means how light or dark something is. Map the main light source early in the drawing. Shade large planes first with soft, even strokes. Use midtones to link darks and lights. Darken shadows like under the chin and eye sockets. Add subtle highlights with an eraser. Blending stumps create soft transitions in skin tones. Cross-hatching adds texture and structure when needed. Watch for reflected light on the jaw and cheek. Keep the darkest darks and the lightest lights to increase contrast. Good tonal work makes a flat sketch feel three dimensional.
Gesture, expression, and capturing personality
A portrait sketch should show personality, not just features. Gesture captures the head tilt and energy. Start with a loose line to show posture and angle. Watch how the head sits on the neck. Expression lives in eyes, brow, and mouth. A slight eyebrow lift can change mood. Small changes to the mouth alter the whole feel. Avoid clinical accuracy only. Let small marks and confident lines suggest character. Fast gesture sketches help you see essential information quickly. Many artists do thirty-second portraits to train expression reading. These quick studies improve the quality of slower portrait sketches.


Composition and cropping for a strong portrait sketch
Good composition makes a portrait sketch more engaging. Decide where the head sits on the page. Leave breathing space around the face. A close crop focuses on expression and eyes. A looser crop can show shoulders and hands. Use the rule of thirds to place the eyes or face. Consider background tone; a light background can make the face read better. Contrast between background and subject helps the portrait pop. Think about line direction and flow within the head. Cropping early helps you plan value and edge treatment. A thoughtful composition supports the likeness and mood of any portrait sketch.
Common mistakes and how to fix them
Many beginners make similar errors in portrait sketching. One common error is flattening the face with only outline work. Fix this by studying planes and adding soft shading. Another issue is making eyes too big or spaced incorrectly. Use your head-width measure to check feature spacing. Overworking small details too early can hurt a sketch. Build up tones gradually. Harsh erasing can damage paper. Use a kneaded eraser and lift gently. Avoid drawing mirrored features that look identical. Human faces are slightly asymmetrical. Measure constantly and step back to see the whole face. These simple fixes improve portrait sketches fast.
Simple step-by-step portrait sketch tutorial
Start a portrait sketch with a light oval for the head. Add a vertical center line and a horizontal eye line. Block in the large shapes of the hair and jaw. Place the eyes, nose, and mouth using the guides. Refine the shapes with soft, careful lines. Map the main shadows and light areas lightly. Build midtones and deepen the darks gradually. Blend transitions with a stump or tissue where needed. Add texture for hair with confident strokes. Finish by lifting highlights with the kneaded eraser. Sign the corner when you feel done. This step-by-step approach keeps the process calm and clear.
Practice exercises to build portrait sketch skills
Regular practice boosts portrait sketch ability quickly. Try daily five-minute face studies from photos. Do one-minute gesture heads to train speed and impression. Practice a single feature each day, like eyes or mouths. Copy master studies to learn classic shading and line work. Draw from a mirror to observe subtle changes in expression. Use a value scale to see light and dark ranges. Keep a sketchbook and date each page. Revisit earlier sketches to see improvement. Track which exercises help most. Consistent short practice beats rare long sessions. Small, regular work builds confidence in every portrait sketch.
Advanced techniques and alternative mediums
Once basic skills are solid, try more advanced portrait sketch techniques. Use charcoal for dramatic value and bold strokes. Charcoal works well for looser, expressive portrait sketches. Try conte crayons for warm tonal skin studies. Ink portraits rely on line weight and cross-hatching. Combine pencil with watercolor washes for mixed media portraits. Use textured paper and a tougher tooth for heavy charcoal. Experiment with erasing negative shapes for highlights. Photorealist portrait sketches require patient layer-building. For an expressive look, loosen your line and focus on gesture. Studying many media expands your visual language and gives new tools for portrait sketching.
Tips for photographing references for portrait sketching
A good reference photo makes a portrait sketch easier. Use soft, even lighting when possible. Natural window light from the side creates nice shadows. Avoid harsh overhead light that flattens faces. Use a tripod or hold your camera steady for clarity. Choose a neutral background that does not distract. Zoom in or crop so the face fills the frame. Save a few photos with different head tilts and expressions. If using color photos, convert one copy to black and white. This helps you focus on value rather than color. Label photos with the date and model name for practice records.
How to keep sketches fresh and expressive
Keeping portrait sketches fresh requires clear goals. Set a time limit to avoid overworking. Use energetic, confident lines instead of tiny scratchy marks. Work from large shapes to details. Keep erasing minimal to preserve lively marks. Try different tools, like a soft brush to lift powdered charcoal. Change your viewpoint or distance often. Add a quick gesture layer at the start to capture movement. Let imperfections live when they add character. Study portraits from many artists to find fresh visual ideas. A varied practice routine keeps your portrait sketch voice alive and evolving.
Building a simple portrait sketch portfolio
A small portrait sketch portfolio shows growth and style. Include a range of studies from quick gestures to refined sketches. Show work in different media like graphite and charcoal. Present pieces that highlight likeness, expression, and shading skill. Label each sketch with date and brief notes on technique. Organize the portfolio by theme or medium for clarity. Keep images high quality and well-lit. Show progress by including older and newer work together. A focused portfolio helps secure commissions, studies, or class feedback. Update it regularly as your portrait sketch skills improve.
Troubleshooting likeness and accuracy
Likeness is the hardest part of portrait sketching. Compare key landmarks often. Check the space between the eyes and the head width. Measure the jaw angle and compare both sides of the face. Use sighting tools like a pencil held at arm’s length. Flip the image horizontally to see proportional errors. Squint to read lights and darks rather than lines. If a nose looks off, recheck the angle and width. Adjust slowly rather than erase heavily. Small shifts in line and value create big likeness gains. Learn to accept slight asymmetry in most faces.
Ethical and respectful portrait sketching practices
Respect is vital when sketching people. Ask permission before drawing a stranger. Offer a small token or print if you show their sketch publicly. Be mindful of cultural and personal sensitivity. Avoid altering features in a way that mocks or stereotypes a person. When sharing sketches online, get consent or anonymize if needed. Credit models and reference photos when possible. If you teach portrait workshops, use respectful language and supportive feedback. These small ethical practices build trust with subjects and viewers. Good ethics make your portrait sketch work more professional and meaningful.
Recommended learning resources and next steps
There are many helpful books and videos for portrait sketching. Look for guides on head construction and value studies. Attend life drawing sessions when possible. Join local or online sketch groups to share feedback. Use step-by-step tutorials to build technique slowly. Study anatomy basics for deeper understanding of facial muscles. Practice with short daily goals and track improvement. Seek critique from trusted teachers or peers. Gradually try new media and more challenging poses. Your next steps depend on your goals, whether casual practice or studio mastery. Keep learning and stay curious about faces and light.
FAQs
Q1: How long does it take to learn a good portrait sketch?
Learning varies by person and practice. Regular short sessions work best. Spend ten to thirty minutes daily. Focus on fundamentals like proportions and values. After a few months, many see clear progress. Some skills like likeness take longer. Keep sketching and reviewing your work. Track improvement by keeping dated pages. Patience and consistent practice matter more than speed.
Q2: What pencils are best for a portrait sketch?
A small set of pencils covers most needs. Use HB for light lines. Use 2B to 4B for midtones. Use 6B or 8B for deep darks and rich shadows. A mechanical pencil helps detailed areas. A charcoal pencil can add bold darks. A kneaded eraser is useful for pulling highlights. Start with basic grades and add more as you refine style.
Q3: Can I make a portrait sketch from a smartphone photo?
Yes, you can use a smartphone photo. Make sure the photo is sharp and well lit. Crop the face to remove distracting background. Convert to black and white to study values. Use multiple photos for variety. Remember that photos can flatten depth. Compensate with clear shading and tonal work in your sketch.
Q4: How do I keep the face from looking flat?
Avoid relying on outlines only. Study light and shadow to build form. Use gradual shading to show planes of the face. Place darker shadows in eye sockets and under the chin. Add midtones to connect lights and darks. Keep highlights crisp on the nose bridge and cheekbones. This layering gives depth and avoids a flat portrait sketch.
Q5: Is shading or line more important in a portrait sketch?
Both shading and line play roles. Line defines edges and important shapes. Shading models the form and creates volume. Start with light lines for placement. Build shading to show mass and light. Use delicate lines for details in the final stage. Many strong portrait sketches blend both elements well.
Q6: How can I capture a likeness faster?
Work from broad to specific quickly. Start with the head shape and major landmarks. Use simple measurements for eye spacing and nose placement. Squint to read lights and darks rather than lines. Train with timed sketches to read features fast. Over time, your eye learns the small proportions that make likeness. This practice speeds up accurate portrait sketching.
Conclusion and next steps
A portrait sketch is a friendly bridge between seeing and drawing. With simple tools and steady practice, you can make strong portrait sketches. Focus on proportions, values, and expression first. Use short daily exercises to build skill. Study many faces and media to find your style. If you want, share a sketch or describe where you feel stuck. I can suggest tailored exercises and tips for your next steps. Keep drawing, enjoy the process, and celebrate small improvements in every portrait sketch.