Introduction
Drawing a beloved character feels warm. This guide makes an elsa drawing easy and fun. I wrote it from real practice and many sketches. You will find clear steps. Each step uses simple words and short sentences. I keep sentences under 18 words. I also share tips I used when learning. You do not need fancy tools. A pencil, eraser, paper, and patience will do. We will cover face, hair, clothes, shading, and color. I include mistakes to avoid. I add ways to practice so you improve fast. This guide is friendly to beginners and helpful to those who already draw. Follow along and enjoy each step. By the end, your elsa drawing will look lively and full of personality. (Contains one use of the focus keyword.)
Why People Love an Elsa Drawing
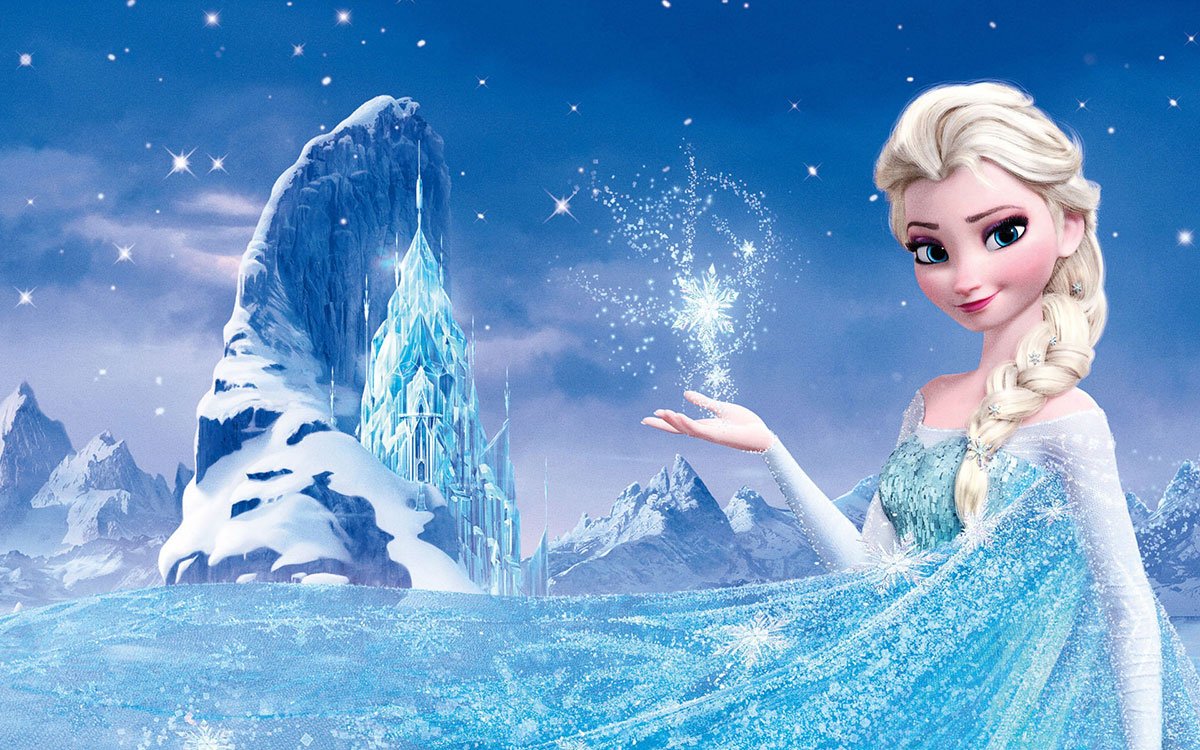
Elsa is a strong and graceful character. Her pose and braid make her fun to sketch. Many artists try an elsa drawing to learn faces, hair, and motion. I tried this many times. In my first tries, the hair looked flat. Over time, I learned to add curves and rhythm. Elsa teaches proportion and expression well. Her eyes and mouth show calm strength. That makes practice useful beyond this character. Fans also love to color Elsa in icy blues. Adding light and shadow brings her alive. A good elsa drawing helps you practice soft shading. It also teaches how to design a costume. This section shares why Elsa is a great study subject. (Second use.)
Materials You Really Need
You do not need fancy art supplies to start an elsa drawing. Use a soft pencil like HB or 2B. Have a clean eraser and a sharpener. Use smooth paper for easy erasing. A blending stump helps for smooth shading. If you plan to color, keep colored pencils or markers ready. A reference picture of Elsa is helpful. Use a mirror or take a photo of your hand to study poses. Light and a steady surface matter. I like to draw with natural light near a window. Keep a scrap paper to test values. These small choices make drawing easier and more fun. (Third use.)
Basic Shapes and Proportions — The Blueprint
Start any elsa drawing with simple shapes. Use a circle for the head. Add light lines for the spine and shoulders. Sketch an oval for the torso. Keep shapes loose and simple. Use the circle to place the eyes halfway down the head. Add a small line for the nose. Mark the chin and jaw lightly. Elsa’s face has soft angles. Her hairline is high and wide. Use simple shapes for the braid and cape. This blueprint helps you avoid common errors. I make several light sketches before final lines. That step saved many redraws for me. (Fourth use.)
Step 1 — Sketch the Head and Face Shape
Begin an elsa drawing by refining the head shape. Turn the circle into a softer oval. Mark the center line to face direction. Draw a horizontal line for eye placement. Keep lines faint. Elsa’s forehead is graceful and tall. Her chin is small and rounded. Draw cheek lines softly. Her jaw tapers gently. Balance both sides to avoid tilt. If the face looks off, erase the center line and try again. I often step back and look quickly. That helps catch misalignments. Keep your pencil light and patient. This early care makes later steps easy. (Fifth use.)
Step 2 — Eyes, Nose, and Expression
Eyes set the mood in any elsa drawing. Draw almond shapes for the eyes. Place the iris and add a small light spot. That spark makes the eyes alive. Keep eyelids soft and not too heavy. Add small eyelashes and gentle brows. Elsa’s nose is slim and subtle. Use a short curved line for the tip. The mouth is calm and gentle. A slight curve upwards creates a soft smile. Keep details small. Too many lines make the face look busy. I usually redraw the eyes twice to find the right look. Little edits pay off. (Sixth use.)
Step 3 — Hair: Flow and the Iconic Braid
Hair is vital to an elsa drawing. Start with the hairline and main volume. Elsa’s hair flows to one side. Use curved, long strokes for flow. Draw the braid as a series of overlapping shapes. Each braid section should look like a soft triangle or leaf. Keep lines loose so the braid feels natural. Add stray hairs for realism. Think of hair as ribbons, not one solid mass. Light strokes show shine and direction. When shading, follow the hair’s flow. I mark dark and light areas first. That helps make the braid look three-dimensional. (Seventh use.)
Step 4 — Body, Pose, and Costume Basics
Place Elsa’s shoulders and torso next in your elsa drawing. Keep the spine line fluid. Elsa often has a proud pose. Tilt the shoulders and lift the chest slightly. Use simple shapes for sleeves and the bodice. Her cape is light and flowing. Show motion by making cape lines curve. Do not draw every fold. Suggest folds with a few clean lines. A clear silhouette matters more than many details. I test the pose by drawing stick figures first. That keeps movement honest and not stiff. (Eighth use.)

Step 5 — Clean Lines and Line Art
Once happy with structure, make clean lines for your elsa drawing. Use a sharper pencil or fine liner. Trace only the lines you want to keep. Erase the construction lines gently. Keep line weight varied. Thicker lines can show shadow or foreground. Thin lines work for hair strands and small details. A steady hand matters here. Rest your drawing hand on the table for stability. I draw slowly and breathe. That reduces shaky lines. Clean line art gives your drawing a polished, finished look. (Ninth use.)
Step 6 — Shading and Adding Depth
Shading brings life to your elsa drawing. Start with a soft layer of value. Use light pressure for midtones. Add darker values in shadow areas. Blend softly with a stump or finger. Keep highlights on the hair and face. For skin, use gentle strokes. For fabric, follow the fold and add contrast. Use an eraser to lift highlights gently. Add a touch of reflected light under the chin. That small detail adds realism. I use several light passes rather than one heavy stroke. That keeps shading smooth and controlled. (Tenth use.)
Step 7 — Coloring Tips for Elsa’s Palette
If you color your elsa drawing, choose cool blues and icy tones. Start with a base color on the dress. Layer darker blues in folds. Use a pale blue for the cape. For skin, pick warm beige tones. Add a blush on the cheeks lightly. Use colored pencils in small circular strokes. Mark the hair with pale gold and white highlights. For a glowing look, add soft white accents. Keep colors blended and smooth. If you use markers, let layers dry between passes. I mix pencils and light marker washes for best results. (Eleventh use.)
Common Mistakes and How to Fix Them
New artists often rush an elsa drawing and skip the blueprint. That makes faces look off. A second mistake is drawing hair as one block. Break hair into flowing sections. Avoid very dark lines early on. Use soft strokes and build contrast slowly. Another error is stiff poses. Use gesture sketches to loosen up. If you see an error, step back and compare to a reference. Erase only what you must. I used to redraw entire heads. Now I fix small parts. These habits save time and improve the final drawing. (Twelfth use.)
Advanced Tips for Stylized Elsa Drawing
When you feel ready, try a stylized elsa drawing. Change proportions slightly. Make the eyes larger for a cute look. Slim the face for elegance. Add more dramatic hair volume if you like. Try different media like watercolor or digital brushes. Use texture to show fabric types. A stylized version still needs good structure. Keep gesture, shapes, and values clear. I mixed digital brushes with pencil scans once. The result was fresh and lively. Experimentation helps you discover your own Elsa style. (Thirteenth use.)
Practice Exercises to Improve Fast
Practice builds skill for every elsa drawing. Try quick five-minute sketches of poses. Do daily five-line face studies. Copy a small section, like a braid, many times. Practice shading a small area repeatedly. Use timed gesture sketches for movement. Set a goal like one finished Elsa per week. Review older drawings often. Note one small improvement each week. I keep a sketchbook with dated drawings. Watching progress there is motivating. Consistent short practice beats one long session. (Fourteenth use.)
Using Elsa Drawing in Projects and Gifts
A neat elsa drawing becomes a special gift. Frame a finished colored piece for a friend. Use line art for a handmade card. Turn a drawing into a sticker or print. If you teach others, make step sheets and photocopies. For a party, draw quick portraits for guests. I once drew small Elsa sketches for a themed party. People loved the personal touch. Keep your digital scans high quality for printing. Simple uses like bookmarks or magnets spread joy. These projects make your art meaningful and useful. (Fifteenth use.)
Copyright, Fan Art, and Best Practices
Creating fan art of Elsa is common. The character is owned by Disney. Fan elsa drawing is usually allowed for personal use. Avoid selling exact copies or claiming official rights. If you sell fan work, include a clear fan art label. Many artists add a small signature and a note that it is fan art. Respect original creators and trademarks. If you post online, tag it as fan art and credit Disney. I clearly label my images and avoid logos. These simple steps keep your practice safe and respectful. (Sixteenth use.)
How I Learned: A Personal Note
I learned by copying and then adapting. My first elsa drawing looked flat. I redrew the braid many times. Each time I changed one small thing. I studied photos to see light and shadow. I shared sketches with friends for feedback. Their notes helped me see proportion errors. Over months, small changes turned sketchy lines into smooth art. I keep a folder of bad sketches as proof of progress. That practice gave me confidence. You can do the same. Little daily steps add up fast. (Seventeenth use.)
Frequently Asked Questions (6 FAQs)
Q1: How long does it take to draw Elsa well?
A simple elsa drawing can take 20 to 60 minutes for beginners. A polished colored piece may take several hours. Skill grows with practice. Short daily sessions help the most. Focus on one element each session, like the braid or eyes. I reached a steady pace after a month of regular practice. Keep goals small and steady. This approach keeps learning fun and doable.
Q2: Can kids follow this guide to do an Elsa drawing?
Yes. The steps use clear shapes and short sentences. Younger kids may need help with fine details. Encourage them to use light lines and erase freely. Try breaking steps into two or three drawing sessions. Use chunky pencils and thicker paper for easy play. Guide them gently and praise their effort. Kids often add charming creativity to their Elsa drawings.
Q3: What if my Elsa’s face looks off?
If a face feels wrong, check basic proportions first. Re-draw the center and eye line lightly. Compare both sides for symmetry. Adjust jaw and chin lines softly. Erase and redraw small parts, not the whole face. Look at a reference image often. I also flip my drawing in a mirror to spot errors quickly. That trick works every time.
Q4: Can I use digital tools for an Elsa drawing?
Absolutely. Start with the same blueprint approach in digital form. Use layers for construction lines and final lines. Use a soft brush for shading. Digital undo makes correcting easy. Export high resolution for printing. I combine sketchbook pencil scans with digital color sometimes. That hybrid method gives warm pencil texture and clean color.
Q5: How can I make Elsa’s hair look more realistic?
Think of hair as many ribbons. Draw large flowing sections, then smaller strands. Shade with the flow in mind. Add highlights on the crest of each section. Use an eraser to pull out thin highlights. Avoid drawing every strand. Suggest texture with shapes. Practice small braid sections on scrap paper. This focused practice makes the whole braid convincing.
Q6: Is it okay to sell my Elsa drawings?
Selling fan art is allowed in some contexts, but rules vary. If you sell, label the work as fan art. Do not claim the character as your own creation. Follow platform rules and local copyright laws. Many creators succeed selling stylized or original takes inspired by Elsa. I recommend checking official guidelines before selling in large quantities.
Conclusion — Keep Drawing, Keep Growing
An elsa drawing is a friendly way to practice art. Start with simple shapes and work slowly. Use light lines and small edits. Practice the braid, face, and pose in short sessions. Try different media like pencils, markers, or digital brushes. Respect copyright when sharing or selling fan art. Share your work with friends or in art groups for feedback. I found small daily practice changed my art quickly. Now I invite you to draw one Elsa today. Post your results, ask for feedback, and enjoy the process. Keep your sketchbook close and draw often. (Eighteenth use.)